很多客户端软件和浏览器软件都喜欢用Tab分页标签来管理内容,除了可以用TabHost控件,还可以用ImageButton + ActivityGroup实现Tab分页标签。使用ImageButton + ActivityGroup实现Tab分页标签,主要是把一个Sub Activity(子Activity)的Window作为View添加到ActivityGroup所指定的容器中,本文使用LinearLayout作为容器装载Sub Activity。
接下来贴出本例运行的效果图:

以下是切换时Sub Activity的生存周期的状态变化:
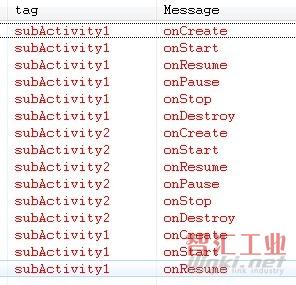
从subActivity1切换到subActivity2的时候,会彻底释放subActivity1的资源。
主Activity的main.xml的源码如下:
view plaincopy to clipboardprint?
《?xml version=“1.0” encoding=“utf-8”?》
《LinearLayout xmlns:android=“http://schemas.android.com/apk/res/android”
android:orientation=“vertical” android:layout_width=“fill_parent”
android:layout_height=“fill_parent”》
《LinearLayout android:id=“@+id/LinearLayout01”
android:layout_height=“wrap_content” android:layout_width=“fill_parent”》
《ImageButton android:layout_width=“wrap_content”
android:layout_height=“wrap_content” android:id=“@+id/ibtnTab1”
android:background=“@drawable/png1298”》《/ImageButton》
《ImageButton android:layout_width=“wrap_content”
android:layout_height=“wrap_content” android:id=“@+id/ibtnTab2”
android:background=“@drawable/png1292”》《/ImageButton》
《/LinearLayout》
《LinearLayout android:id=“@+id/LinearLayout02”
android:layout_width=“fill_parent” android:layout_height=“fill_parent”》《/LinearLayout》
《/LinearLayout》
Sub Activity的XML源码(listview.xml)如下:
view plaincopy to clipboardprint?
《?xml version=“1.0” encoding=“utf-8”?》
《LinearLayout android:id=“@+id/LinearLayout01”
xmlns:android=“http://schemas.android.com/apk/res/android”
android:layout_width=“fill_parent” android:layout_height=“fill_parent”》
《ListView android:id=“@+id/MyListView” android:layout_width=“fill_parent”
android:layout_height=“fill_parent”》
《/ListView》
《/LinearLayout》
testActivityGroup.java源码如下:
view plaincopy to clipboardprint?
package com.testActivityGroup;
import android.app.ActivityGroup;
import android.content.Intent;
import android.os.Bundle;
import android.view.View;
import android.view.Window;
import android.widget.ImageButton;
import android.widget.LinearLayout;
import android.widget.ListView;
public class testActivityGroup extends ActivityGroup {
/** Called when the activity is first created. */
LinearLayout container;//装载sub Activity的容器
ImageButton ibtnTab1,ibtnTab2;
@Override
public void onCreate(Bundle savedInstanceState) {
super.onCreate(savedInstanceState);
setContentView(R.layout.main);
container = (LinearLayout) findViewById(R.id.LinearLayout02);
ibtnTab1=(ImageButton)this.findViewById(R.id.ibtnTab1);
ibtnTab1.setOnClickListener(new ClickEvent());
ibtnTab2=(ImageButton)this.findViewById(R.id.ibtnTab2);
ibtnTab2.setOnClickListener(new ClickEvent());
}
class ClickEvent implements View.OnClickListener{
@Override
public void onClick(View v) {
container.removeAllViews();
Intent intent=new Intent(testActivityGroup.this, subActivity.class);
intent.addFlags(Intent.FLAG_ACTIVITY_CLEAR_TOP);
String[] str=new String[12];
if(v==ibtnTab1)
{
for(int i=0;i《str.length;i++)
str[i]=“单选”+String.valueOf(i);
intent.putExtra(“Name”, “subActivity1”);
intent.putExtra(“Strings”, str);
intent.putExtra(“ChoiceMode”, ListView.CHOICE_MODE_SINGLE);//通过参数设置列表式样
}
else if(v==ibtnTab2)
{
for(int i=0;i《str.length;i++)
str[i]=“复选”+String.valueOf(i);
intent.putExtra(“Name”, “subActivity2”);
intent.putExtra(“Strings”, str);
intent.putExtra(“ChoiceMode”, ListView.CHOICE_MODE_MULTIPLE);//通过参数设置列表式样
}
Window subActivity=getLocalActivityManager().startActivity(“subActivity”,intent);
container.addView(subActivity.getDecorView());
}
}
}
subActivity.java源码如下:
view plaincopy to clipboardprint?
package com.testActivityGroup;
import android.app.Activity;
import android.os.Bundle;
import android.util.Log;
import android.widget.ArrayAdapter;
import android.widget.ListView;
public class subActivity extends Activity {
String name;
public void onCreate(Bundle savedInstanceState) {
super.onCreate(savedInstanceState);
setContentView(R.layout.listview);
// 读取列表内容
name = this.getIntent().getStringExtra(“Name”);
String[] str = this.getIntent().getStringArrayExtra(“Strings”);
int choiceMode = this.getIntent().getIntExtra(“ChoiceMode”,
ListView.CHOICE_MODE_NONE);
ListView listView = (ListView) findViewById(R.id.MyListView);
// 设置列表的式样
int itemID = android.R.layout.simple_list_item_1;
if (choiceMode == ListView.CHOICE_MODE_MULTIPLE)// 主Activity要求多选
itemID = android.R.layout.simple_list_item_multiple_choice;
else if (choiceMode == ListView.CHOICE_MODE_SINGLE)// 主Activity要求单选
itemID = android.R.layout.simple_list_item_single_choice;
ArrayAdapter《String》 arrayAdapter = new ArrayAdapter《String》(this,
itemID, str);
listView.setAdapter(arrayAdapter);
listView.setChoiceMode(choiceMode);
Log.e(name, “onCreate”);// 显示当前状态,onCreate与onDestroy对应
}
@Override
public void onDestroy() {
super.onDestroy();
Log.e(name, “onDestroy”);// 显示当前状态,onCreate与onDestroy对应
}
@Override
public void onStart() {
super.onStart();
Log.e(name, “onStart”);// 显示当前状态,onStart与onStop对应
}
@Override
public void onStop() {
super.onStop();
Log.e(name, “onStop”);// 显示当前状态,onStart与onStop对应
}
@Override
public void onRestart() {
super.onRestart();
Log.e(name, “onRestart”);
}
@Override
public void onResume() {
super.onResume();
Log.e(name, “onResume”);// 显示当前状态,onPause与onResume对应
}
@Override
public void onPause() {
super.onResume();
Log.e(name, “onPause”);// 显示当前状态,onPause与onResume对应
}
}
(审核编辑: 智汇小新)


